Why image optimization is your site's secret weapon
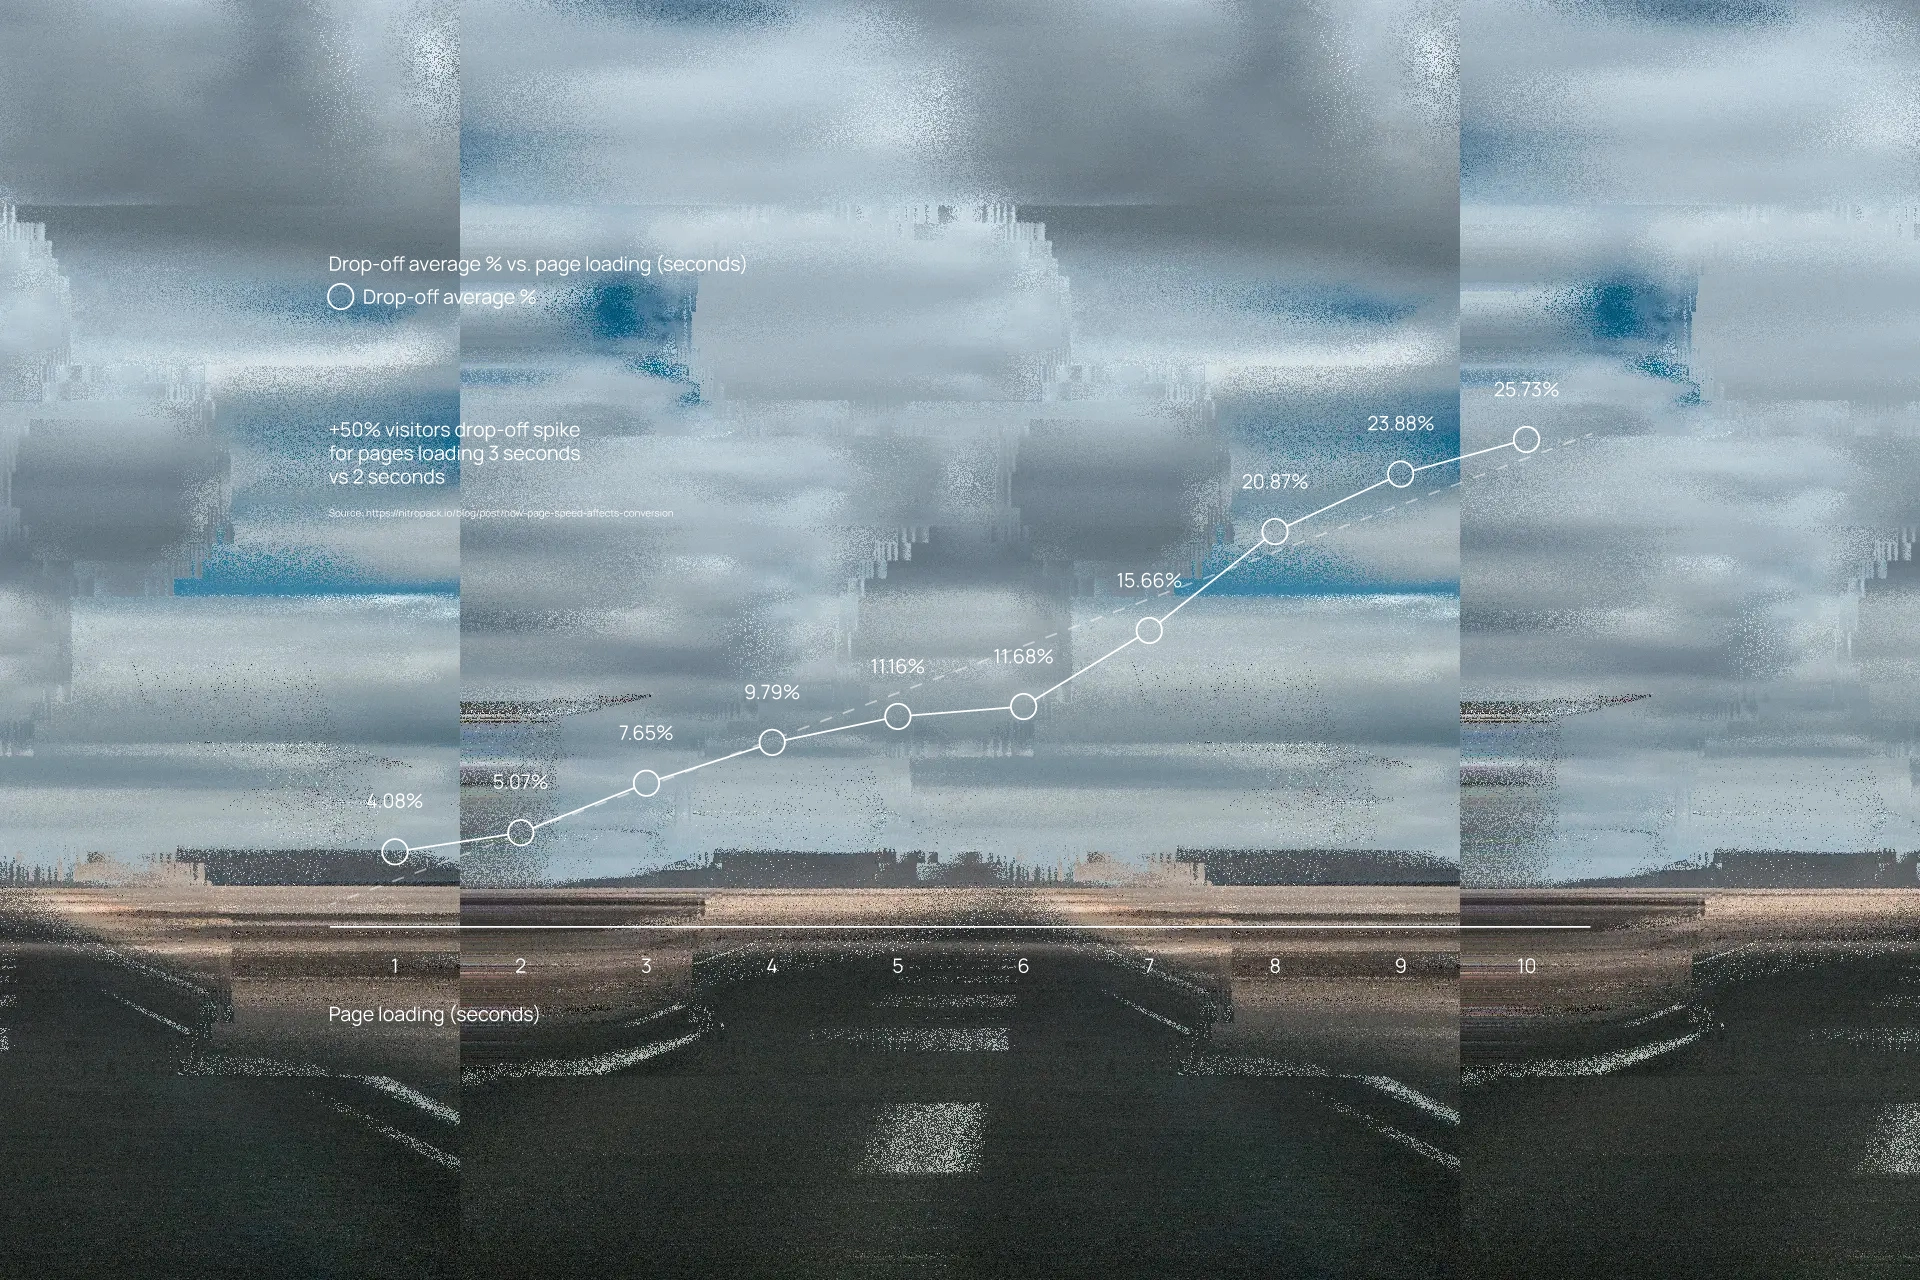
Ever land on a website that grinds to a halt? You're not alone. Endless loading, jumbled layouts. It’s a quick ticket to hitting the back button. Often, the culprit is hefty, unoptimized images, especially on visually rich sites for architecture or real estate firms. But here's the thing: you don't have to ditch the visuals for speed.
Your website needs to deliver information, fast. Optimizing your images isn't just a tech tweak; it's about a better user experience, stronger SEO, and ultimately, more conversions. Here’s some tips on how to use high-quality images without the frustrating lag.
.webp)
What to aim for: the specific optimization targets
To ensure we're on the right track, let's establish clear, actionable benchmarks that artfully balance visual quality with optimal performance:
- Maximum page weight: Strive to keep your entire page under 2MB for lightning-fast loading. Ideally, individual images should be under 500KB each.
- Hero images: Make a powerful first impression without the wait. Large banner images should not exceed 800KB.
- Content images: Enhance your content without slowing it down. Aim for 200-600KB per image embedded within your text and layouts.
- Thumbnail images: Ensure rapid loading of image grids and previews by keeping thumbnails under 300KB.
- Full-width images: For expansive visuals, optimize dimensions. Target around 2000px to 3000px width for horizontal images and approximately 1500px to 2500px height for vertical orientations.
- Background images: Create immersive experiences efficiently. Background images can be up to 3000px by 2600px (maintaining a 16:10 ratio) at 72 PPI, but crucially, keep the file size under 1MB.
- Image count: While visuals are vital, excessive HTTP requests can hinder performance. When possible, limit your page to 15-20 images.
Remember: On the web, only pixel dimensions directly impact display size. You can generally disregard DPI/PPI for screen viewing (though 72 PPI remains a common standard).
Reevaluate your image formats
While JPEG and PNG have been reliable workhorses, modern image formats offer significant advantages in compression efficiency without sacrificing visual fidelity. Here are some examples:
- WebP: Google's innovative format delivers exceptional compression while preserving impressive visual quality. Its versatility shines through support for both lossy and lossless compression, transparency, and even animation, positioning it as a compelling alternative to JPEG, PNG, and GIF.
- AVIF: Since its widespread browser support in January 2024, AVIF has emerged as a frontrunner in image compression. It can achieve file sizes up to 10x smaller than JPEGs with comparable visual quality, all while supporting transparency and High Dynamic Range (HDR).
- SVG: This vector-based format utilizes XML to define shapes and paths, making it resolution-independent. SVGs scale infinitely without any loss of quality and often result in smaller file sizes compared to raster images for simpler graphics like logos and icons.
Compress images without losing quality
Image compression isn't a one-size-fits-all endeavor. The key lies in finding the perfect equilibrium between minimizing file size and maintaining acceptable visual quality:
- Lossy compression: Think of this as strategically decluttering. The algorithm intelligently discards data deemed less visually significant (like subtle color variations or minor background details). This yields smaller file sizes but involves a permanent reduction in image quality.
- Lossless compression: This approach is akin to meticulous organization. The algorithm restructures the image data more efficiently without discarding any information. It preserves every detail but typically results in less dramatic file size reductions compared to lossy compression.
- Quality settings: For formats like JPEG and WebP, experimenting with quality settings between 60%-85% often strikes an excellent balance between file size and perceived quality. For crucial visuals like product images or professional photography where intricate details matter, consider aiming for slightly higher settings.
Mastering image optimization tools
Here are some tools to effectively leverage popular image optimization tools to achieve the best results:
1. Squoosh (squoosh.app)
- Step-by-step usage guide:
- Navigate to squoosh.app in your web browser.
- Simply drag and drop your image directly onto the interface.
- On the left, you'll see the original image; on the right, the optimized version. Select your desired output format (WebP is highly recommended for most scenarios).
- Utilize the quality slider on the right to interactively find the optimal balance between file size reduction and visual quality. Observe the changes in real-time.
- For granular control, expand the "Advanced" section to fine-tune parameters such as:
- Color quality (chroma subsampling): Adjust how color information is compressed.
- Effort level: Higher effort generally yields better compression but takes slightly longer.
- For images with transparency, independently adjust the alpha quality.
- Employ the intuitive comparison slider in the middle to meticulously assess the visual differences between the original and optimized images.
- Once satisfied, click the download button to save your optimized image.
- Pro tip: For photographs containing large areas of uniform color, experiment with the "Reduce palette" option. This can often lead to significant file size reductions without noticeable quality loss.
2. TinyPNG/TinyJPG (tinypng.com)
- Step-by-step usage guide:
- Visit tinypng.com (for PNGs) or tinyjpg.com (for JPEGs). Both interfaces function identically.
- Drag and drop up to 20 resized images into the designated upload area.
- The tool will automatically apply intelligent lossy compression. Simply wait for the optimization process to complete.
- You can download individual optimized images or download the entire batch as a convenient ZIP file.
- Pro tip: TinyPNG excels at optimizing screenshots, diagrams, and user interface elements that often contain large areas of solid colors.
3. Compress-or-Die (compress-or-die.com)
- For WebP optimization:
- Go to compress-or-die.com/webp.
- Upload your image file.
- Adjust the quality setting (a range of 70-80% is generally a good starting point).
- For images with transparency, utilize the separate alpha quality control.
- Consider enabling "Sharper color edges" for potentially sharper rendering of text edges within images.
- Use the before/after comparison to assess the results and then download your optimized image.
- Pro tip: When optimizing images with text overlays, you might find that slightly increasing the alpha quality while moderately decreasing the overall quality can preserve text sharpness while still achieving significant file size reduction.
Give a few of these a try. By embracing these strategies and tools, you'll be well-equipped to navigate the image optimization landscape and deliver a faster, more engaging web experience for your audience.

Keep up with Bullhorn
Connect on LinkedIn or Instagram
Buy Brad’s naming book